This article provides instructions for setting up the DNA Server, deploying your Agents, configuring profiles and provides an overview of useful functionality within NetSupport DNA.
Installing the DNA Server
To install the DNA Server, you need to download the setup.exe from your Support account on our website www.netsupportsoftware.com. Once downloaded, run the setup.exe and select Server installation.

Click Next. You can either create a DNA Database on one of your existing SQL instances or if you do not have one, you can install SQL Server Express 2019 by clicking Next.

Please note that SQL Server Express 2019 only allows a maximum of 10 GB of storage. If you require more, you will need to purchase a full SQL.
If you are using your own SQL, select Not required – using a remote SQL Server. You then need to point the installer to your SQL location and enter the system administrator account and password to create the database on your SQL. Click Next.
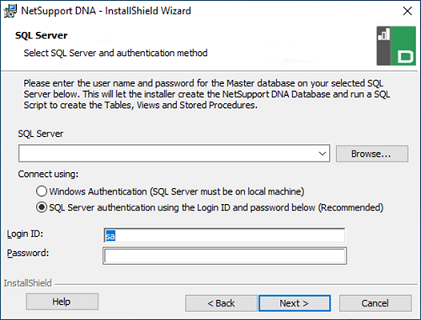
You will be required to enter a user name and password for the Console login, this will be the default Administrator. Click Next.

At the final part of the installation, depending on the package purchased, you will need to install the required version. Click Next.

Once the installation has been completed, you can then log into your DNA Console. A summary page is displayed, providing an overview of the DNA components and your licence information.

Deploying the Agent
Now that the DNA Server has been implemented, you need to deploy the Agent to the machines. There are two methods that can be used:
- Via the Discovery and Deploy tool located within the Tools section of the DNA Console.
- Creating a deployment package to be used through Active Directory or SCCM.
Deploying using the Discovery and Deploy tool
- In the Tools tab, click the Discovery and Deploy icon.
- The Deploy window will appear.

There are three options you can use to deploy: IP address, Windows Networking or Active Directory. If you wish to deploy via IP address, you need to ensure you have entered an IP range. Select the network groups if using Windows Networking or select the PCs to include if using Active Directory.
When deploying to a machine, you can set additional options. Select the required machine(s), click Deploy and then click Options. From here, you can change how the Agent connects – either by Server name or IP address.

Once you are happy with your configuration, click OK to start the deployment.
Deploying via Active Directory
If you choose to deploy through Active Directory, you need to ensure you have two files within your package:
- The Agent .msi. This can be downloaded from your Support account.
- The DNA.ini. This file tells the Agent where the DNA Server is. It can be found in the following location:
C:\Program Files (x86)\NetSupport\NetSupport DNA\Console
You may need to edit this manually in Notepad to point to your Server.
Below is the entry for the DNA.ini file. Within this, you can tell the Agent the Server address, if you want to install the filter driver (this allows internet restriction to be placed) and the installation directory – if you leave this entry blank, it will install in the default location.
[All]
ServerAddress=
InstallDir=
[Client]
EnableLSP=1
NOARP=1
ServerAddress: IP address or hostname of computer where the DNA Server application resides or on a remote network where the Client Gateway resides.
EnableLSP: 1=Install LSP, 0=Do not install LSP.
NoARP: 0=Allow Add/Remove Programs entry, 1=No Add/Remove Programs entry.
Once the package has been created, it needs to be placed on a share and set up as a software installation and target the required machines.
Profiles
Now that the Agent has been installed, you can create profiles for your staff and users.
NetSupport DNA allows you to create multiple profiles for different groups of devices or users, each with specific component settings. This allows you to create a profile for the students in which you can apply restrictions and another profile for the teachers, which allows them more freedom.
Note: Profiles assigned at user level will override a profile that has been applied at any other level.
The administrator can also control the time intervals between data updates from DNA Agent PCs. For further information, please refer to the following article:
Adjust the frequency that data from NetSupport DNA Agents is sent to the DNA Server
Create a new profile
- In the Settings tab, click the Create new profile icon.
- The Add Profile dialog will appear.

- Enter the name and description for the profile. Click OK.
- The Settings dialog will appear.
From here, Administrators/Console Operators can apply the specific settings. An overview of the settings for each component is displayed, allowing you to see which components are currently enabled. A yellow indicator will be displayed when changes have been made to a component but not saved.
The screenshot below is an example of the features you may want to be enabled for your students.
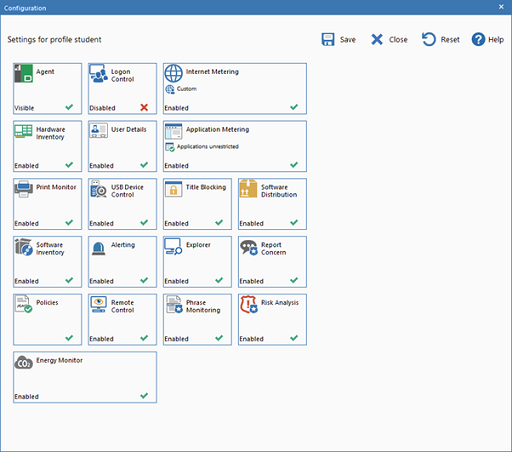
Clicking an icon will take you into the settings for that area.
You may want to control which websites your students can visit and you can do this by creating approved and restricted lists. First, you determine which URLs it is or isn’t appropriate for students to visit and then use the Internet Metering settings option to activate either list as required. Multiple lists can be created, allowing you to assign different approved/restricted websites to different profiles.
However, for Teaching or Admin staff as an example you may want to apply a different configuration to them using a their own Profile. This could be for example to prevent the thumbnails from being displayed for your staff, to do this you can turn on the Privacy settings. Please refer to the following technical article for further information:
How to turn on privacy thumbnails for certain Agents in the DNA Console
Once you have configured the required settings for each profile, you can then assign them to the required group. In the Manage Profiles dialog, click Assign.

Creating a safeguarding user
NetSupport DNA allows you to create safeguarding users. These are the users that are notified when a student triggers a matched safeguarding phrase or reports a concern.
To create your safeguarding users, please refer to the following technical article:
How to create a Safeguarding User in NetSupport DNA
Configuring the SMTP Server settings
For your safeguarding users to receive email notifications, you must ensure you have configured the SMTP email settings within NetSupport DNA to your email server. For information on how to do this, please refer to the following technical article:
Configuring the SMTP Server settings within NetSupport DNA
Setting up a data retention policy
A data retention policy can be created, allowing you to delete old data automatically to help keep the NetSupport DNA database at a manageable size. A data retention policy is created in the Database Maintenance utility.
- Log into the NetSupport DNA Console.
- In the Tools tab, click the Database Maintenance icon.
- The Database Maintenance dialog will appear.
- Select the Data Retention tab.
For further information on setting up a data retention policy, please refer to the following technical article:
Using Database Maintenance to remove unwanted data