
This guide explains how to configure the settings for your Notification Agents and Notification Console to connect to the NetSupport Notify Server using Intune.
It assumes you have already followed our guide on uploading the ADMX templates into Intune: How to add the NetSupport ADMX template files into Intune
When configuring your Notification Agent and Console to connect to the NetSupport Notify Server using the ADMX template files, ensure you have the following information :
- The NetSupport Notify Server IP address or DNS name.
- The port number the NetSupport Notify Server is listening on.
- The encrypted version of the NetSupport Notify Console and Agent Gateway key (the encrypted value used by the Agents and Consoles differs).
To assist with collecting the encrypted value of the Console or Agent Gateways, you can either request a copy of the NetSupport encryption utility from the NetSupport Support team or configure a NetSupport Notify Agent and Console locally on a machine to connect your Notification Server to and then retrieve the keys.
If you have installed a NetSupport Notify Agent and Console, you can retrieve the keys from the following locations using the steps below:
Retrieving the encrypted key value for the Notification Agent
On a machine with the Agent installed, launch the AgentConfig.exe. This is located in:
32bit C:\Program Files\NetSupport\NetSupport Notify
64bit C:\Program Files (x86)\NetSupport\NetSupport Notify

- Enter the plain text value in the Key and Confirm Key fields.
- Click OK to save the changes.
- On the Agent machine, in the same folder as the AgentConfig.exe, locate the file name config.dat.
- Open the config.dat in Notepad and retrieve the entry after gatewaykey=.
Retrieving the encrypted key value for the Notification Console
- Open the Notification Console.
- Click Servers and then click Add.

- Enter the Server details and the Server key plain text value.
- Click OK to save the settings.
- Open regedit and navigate to HKEY_CURRENT_USER\SOFTWARE\NetSupport\NetSupport Notify\Console.
- Copy the encrypted value found under Servers\Key_0.
Once you have all the required details for each component, configure these to connect to the NetSupport Notify Server via policy logon to Intune. When creating your Intune profile, we recommend creating a global Notification Server policy for your Notification Agents and Console to apply the Notify Server connection details.
- In Intune, go to Devices > Configuration > Create > New policy.
- Select Windows 10 and later, then choose Imported Administrative templates (Preview).

- Enter an easy, identifiable name. This will be the Notification Server details for your Agents and Console.

- To set the Notification Server details against the Agent, go to Computer Configuration/\/NetSupport Notify Agent settings/\/Agent Configuration/\/General.
- Enter the IP address and port number, and ensure you use the encrypted value for the Agent Gateway key, which can be taken from the config.dat file or generated via the encryption utility.

- For the Console, go to Computer Configuration/\/NetSupport Notify Console settings/\/Console Configuration/\/Notify Server connections.
- Set Number of Notify Servers to 1.

- Set Notification Server 1 to Enabled.
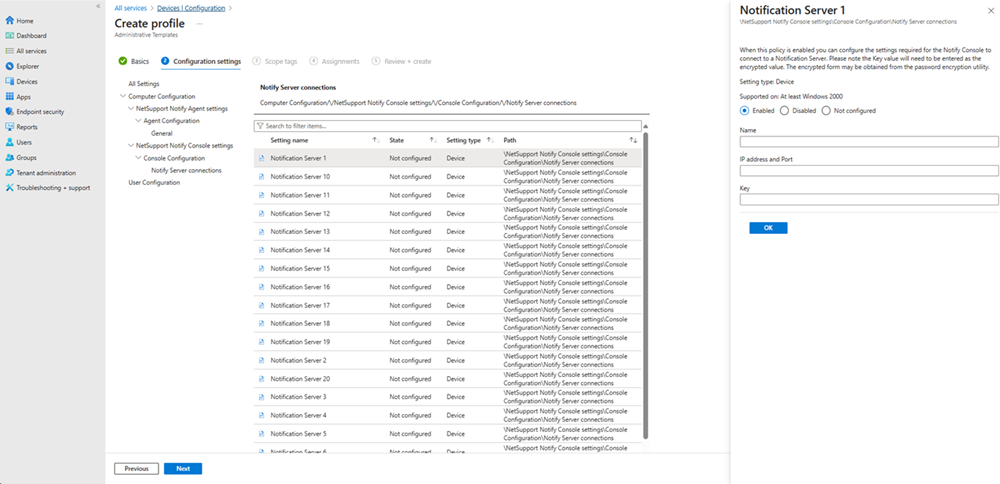
- Enter the IP:Port with the encrypted key for the Console.
- Once complete, you need to target this policy to your machines.