
Users provisioned in classroom.cloud through Microsoft Entra ID cannot be deleted while their status is Active. They must first be removed from the Microsoft Entra provisioning scope and changed to Disabled in classroom.cloud.
Remove users from Microsoft Entra provisioning
Users provisioned through Microsoft Entra ID should first be removed from the provisioning scope of the Enterprise Application used for classroom.cloud user provisioning.
The required steps depend on whether the users are assigned directly to the Enterprise Application or through a Microsoft Entra group.
Remove directly assigned users and groups
- Sign in to the Microsoft Entra admin centre.
- Navigate to Entra ID > Enterprise applications > All applications.
- Select the Enterprise Application used for classroom.cloud user provisioning.
- Select Users and groups.
- Select the users and groups you want to remove.
- Click Remove Assignment and confirm the action.
Remove users assigned through a group
If users are provisioned through a Microsoft Entra group, remove the required users from the group assigned to the classroom.cloud Enterprise Application.
Alternatively, if none of the group members should continue to be provisioned, you can remove the entire group assignment:
- Sign in to the Microsoft Entra admin centre.
- Navigate to Entra ID > Enterprise applications > All applications.
- Select the Enterprise Application used for classroom.cloud user provisioning.
- Select Users and groups.
- Select the required group.
- Select the members and select the users you want to remove.
- Click Remove and confirm the action.
Do not remove the entire group assignment if other group members still require access to classroom.cloud.
Wait for the provisioning cycle to complete
After the users have been removed from the application assignment or provisioning group, wait for the Microsoft Entra provisioning service to synchronise the changes.
The provisioning service runs automatically, typically approximately every 40 minutes.
Once the changes have been processed:
- Sign in to the classroom.cloud Web Portal.
- Navigate to Organisation > All Users.
- Refresh the page.
- Confirm that the affected users now show a status of Disabled.
The users can then be deleted from classroom.cloud.
Manually disable users in classroom.cloud
Alternatively, users can be manually disabled in classroom.cloud before the Microsoft Entra provisioning cycle has completed.
The users must still be removed from the Microsoft Entra Enterprise Application assignment or the assigned provisioning group. Otherwise, they may be provisioned into classroom.cloud again during a future synchronisation cycle.
To manually disable users:
- Sign in to the classroom.cloud Web Portal as an Organisation Admin.
- Navigate to Organisation > All Users.
- Select the users you want to disable.
- Click the Bulk Edit icon in the top-right corner.
- Change the Status to Disabled.
- Click Update.
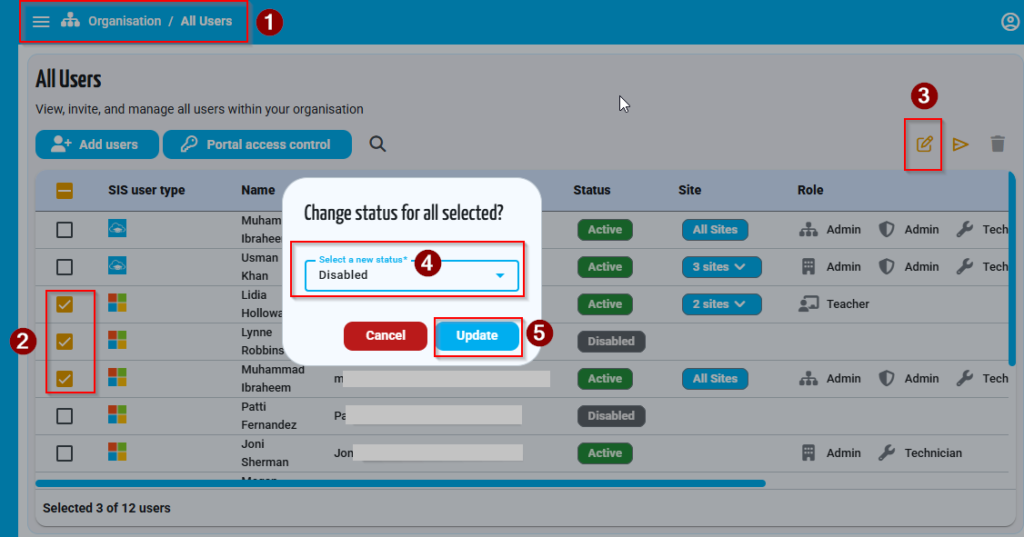
Refresh the All Users page and confirm that the selected users now show a status of Disabled.
Delete the disabled users
Once the users have been disabled:
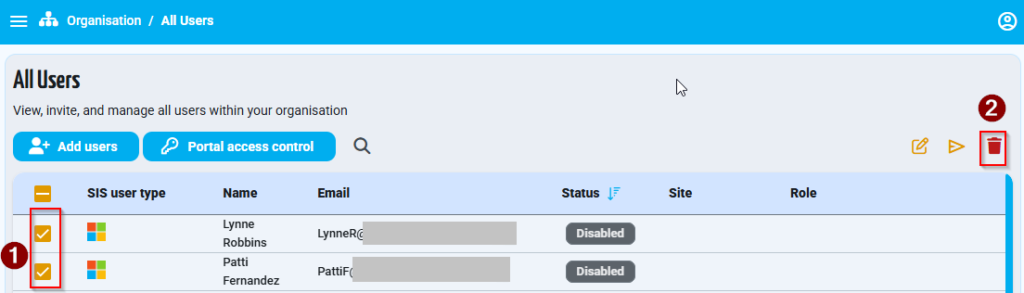
- Navigate to Organisation > All Users.
- Select the disabled users you want to remove.
- Click the Delete icon in the top-right corner.
- Confirm the deletion when prompted.
When removing a large number of users, complete the deletion in batches of up to 100 users.
For assistance with a large-scale user deletion, contact the NetSupport Support team:
Email: [email protected]
Live chat: https://www.netsupportsoftware.com/chat